


Acemiler için Kale Savaşı
İşte buradasınız, kale savaşının muhteşem dünyasına katılmaya karar verdiniz. Bu kılavuz, ilk kale savaşı adımlarınızı atmanıza yardımcı olacak temel bilgileri açıklayacaktır
Terminoloji
Fort fight: Fort battles are a player-versus-player turn based game where two teams of players fight to take over or defend a fort. Fort fight is a team based experience that takes place in chats and lasts for about 1,5 hour.
Crit: A critical hit is a class advantage that only duelers have that deducts an additional 10% off an enemy fighter's maximum health points. Dueler class players have a 10% chance (20% if premium) each round to score a critical hit on an opposing player.
Bail: The action of moving away from the line of fire, usually by dismounting a wall or tower.
Blind Spot: The spot in a sector or tower where you are exposed to as few opponents or as little damage as possible. It is used for blocking purposes.
Ghost: Ghosting is a class advantage only adventurers have and makes them powerful blockers. Starting with the 2nd time they get hit in one round, they get a 25% chance (or 50% for premium) of not being hit at all. It’s not dodging. It’s more than that, it’s like they don’t exist.
Green: When you set your move in a fort fight, your arrow is red. When two fighters agree to swap positions and have set their swap correctly, the arrow between them turns green.
LOS: Acronym of Line Of Sight. This is perhaps the most important thing in a fort fight. It shows you the areas on the map that your character can shoot at and get shot from. You can see your current LOS by hovering the mouse over your character's icon on the fort fighting map. All bright areas are your LOS. The greyed out areas are those that you cannot shoot at and you cannot be shot from. If you move, your LOS will change.
Moat: Sectors outside the fort, next to the towers. Blocking them usually prevents the enemy from moving faster and prepares the attacker to mount a tower or a wall.
Mount: Usually followed by the name of a tower, building or wall. When you are ordered to mount something, aim to move on it (only if you’re next to it).
Negatives: These are the areas that surround and contain the flag. These are the L shaped sectors around the flag plus the square of the flag. They are called like that because they are the only sectors on the fort map that give negative bonus to the person standing on them. The flag area gives -20 on your attack and on your defence value. The L sectors surrounding it give -10 on the attack and on your defence value.
Swap: When either another player or the battle leader ask you to swap positions. Green arrow confirms the swap, red arrow means one of the two players hasn’t set his character to swap.
Point: The spot in a sector or tower where you are exposed to as many opponents possible. Usually taken by players with the highest hp at that current round. A person taking point is protecting those behind him from getting shot, but allows them to shoot at the enemy.
Savaşa Katılmak
Bir kale savaşında yer almak için iki şey her zaman gerçekleşmelidir.
- Kale savaşı için kayıt yaptırmış olmalısın. - Savaş başladığında karakteriniz kalede bulunmalıdır.
Kaydolmak
1) Çok Oyunculu Oyunlar simgesine tıklayın

2) Kale Savaşları simgesine tıklayın

3) Katılmak istediğiniz Kale Savaşını seçin

4) "Hadi Silahlara!" simgesine tıklayın

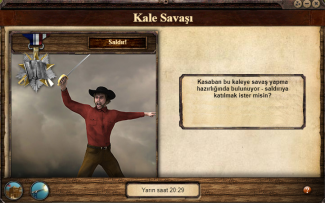
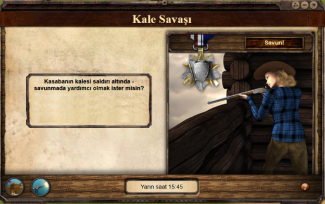
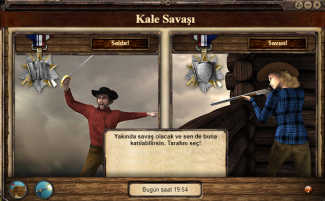
5) Savaşa kaydolun. "Saldırı" veya "savunma" simgelerinin üzerine geldiğinizde, sırasıyla hangi kasabaların saldırıya veya savunmaya katıldığını görebilirsiniz.
 |
 |
 |
Nelere ihtiyacım var?
Kıyafetler
Kale savaşı becerilerinizi artıran kıyafetler giymelisiniz. Bu beceriler Tuzak Kurma, Hayat Puanı (bundan sonra sadece HP' diyeceğiz), Savulma, Saklanma, Nişan ve Yönetmek becerileridir. Mevcut kale dövüşü formülüne bağlı olarak bazı beceriler diğerlerinden daha önemli olabilir. Mevcut kale savaş formülüne buradan ulaşabilirsiniz.
İpucu: Yeni başlayan biri olarak yapılacak en akıllıca şey, HP'nizi artıran kıyafetler giymektir çünkü muhtemelen hareket hataları yapacaksınız. Bu hataların sizi tek bir rauntta öldürmesini istemediğiniz için, alabildiğiniz kadar fazla HP'ye sahip olmak sizi kurtarabilir. Ayrıca, birçok dünyada rütbeler azalan HP bazında verilir; bu, en yüksek HP'ye sahip olanların rütbe alma önceliğine sahip olduğu, daha düşük olanların ise ya beklemek zorunda kaldığı ya da kale savaşına hiç giremediği anlamına gelir. Yani ne kadar çok HP'niz varsa, rütbe alma şansınız o kadar yüksektir. '.
Silah
Kale Savaşı için sol elde kullanacağınız tüfeklerden birine ihtiyacınız olacaktır. Kale savaşlarında kullanılan Tüfeklere buradan ulaşabilirsiniz.
Güçlendiriciler
Söylediğimiz gibi, kale savaşı gücünüz toplam 6 yetenekten etkilenir (Tuzak kurma, HP, Saklanma, Savulma, Nişan Alma ve Yönetmek), bu nedenle bu yetenekleri artırabilecek çok sayıda güçlendirici bulunur. Aşağıda birkaç örnek güçlnedirici listelenmiştir
| Kale Savaşı Güçlendiricileri | |||||
|---|---|---|---|---|---|
| Simge | Güçlendirci Adı | Güçlendirici Türü | Etkisi | Kullanım Hakkı | |
| Muska | Karakter Güçlendirici | +10 Savulmaz, +10 Hayat Puanı | 1 | ||
| Süngü | Eşya Güçlendirici | +25-75 Savaş Hasarı | 1 | ||
| Kaybolan mürekkep | Karakter Güçlendirici | +2 Güç, +15 Tuzak kurmak, +15 Saklanmak, +15% HP bonusu | 5 | ||
| Gümüş cep şişesi | Eşya Güçlendirici | +40-40 Savaş Hasarı | 2 | ||
| Kroket | Karakter Güçlendirici | +2 Harekt, +15 Yöentmek | 5 | ||
| Modern Zırh | Eşya Güçlendirici | +4 Çok Oyunculu Savunma, +10% HP Bonus | 2 | ||
| Sebze Böreği | Karakter Güçlendirici | +2 Beceri, +15 Yönetmek | 5 | ||
| Batılı | Eşya Güçlendirici | +20-60 Savaş Hasarı, +4 Çok Oyunculu Saldırı | 5 | ||
| Mühimmat | Eşya Güçlendirici | +40-60 Savaş Hasarı, +4 Çok Oyunculu Saldırı, +4 Çok Oyunculu Savunma | 5 | ||
Saldırı veya savunma yapınıza göre favori kombinasyonlarınızı test edebilir ve kendiniz bulabilirsiniz.
Katıldıktan sonra - Kale savaşından önce
Yapılacak ilk şeylerden biri savaş sohbet odasını kontrol etmektir; genellikle bu size nereden başlayacağınız ve/veya karakterinizi nereye yerleştireceğiniz konusunda yol gösterecektir. Sohbette başka birinden nereye yerleşeceğiniz konusunda yardım/tavsiye isteyebilirsiniz.
Karakterinizi konumlandırma ve hedef belirleme
Haritada başlamak istediğiniz noktaya bir kez tıklayın. Karakterinizi gösteren sarı bir işaret göreceksiniz. Burası savaş başladığında yerleştirileceğiniz yerdir. Saldıran taraftaysanız ilk konumlanmanız kırmızı alanlara, savunmadaysanız ilk konumlanmanız mavi alana olmalıdır.


İstediğiniz hedef noktasına tıklayın. Kırmızı bir çarpı işareti belirecektir. Savaş başladığında hedefinizi değiştirmediğiniz sürece karakterinizin hareket etmeyi amaçlayacağı yer burasıdır.
Dikkat! Eğer saldırı tarafındaysanız ve karakteriniz için bir hedef belirleyemezseniz, oyun otomatik olarak hedefinizi bayrağa ayarlayacaktır.
Savaş Başlasın!
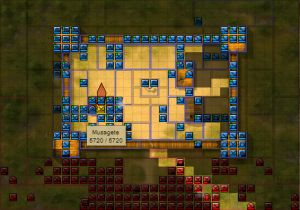
Harita
Tebrikler! Savaşa katılıyorsunuz! Nasıl hareket edeceğinizi anlatmaya başlamadan önce haritaya bir göz atalım.
Dosya:Small fort.jpg Small Fort
Dosya:Med fort.jpg Medium Fort
Dosya:Large Fort.jpg Large Fort
Explanation:
AT stands for Adventurers Tower
DT stands for Duellers Tower
ST stands for Soldiers Tower
WT stands for Workers Tower
You will also hear people saying "AT1" or "DT2" and so on. This is to indicate a specific spot on a tower. The numbers go as follows and they are the same for all four towers:
Hareket
Now let’s go to what we are here for. The battle just started, we know where everything is located on the map and now it's time to fight!
First thing to do: Right click with your mouse on the fort fighting screen, select Quality and set it to low. Doing this will make LOS more clear to see.
Dosya:Los High.jpg Dosya:Los Low.jpg
Karakter Sınıfları
Haritadaki karakterlere daha yakından baktığınızda, oyunda mevcut olan beş sınıfı fark edeceksiniz.

Bazı oyuncuların kare bir karakter veya yarı dairesel bir şekil olarak temsil edildiğini de fark edebilirsiniz

This indicates the difference between specific fighters too. Fighters with a square character are either members of the digging alliance (attackers side) or part of the alliance that owns the fort (defenders side). The rest of the fighters are represented with a semi circular shape. Bu, belirli savaşçılar arasındaki farkı da gösterir. Kare karakterli savaşçılar ya savaşı açan ittifakının üyeleridir (saldıran tarafı) ya da kalenin sahibi olan ittifakın bir parçasıdır (savunan taraf). Geri kalan savaşçılar yarım daire şekliyle temsil edilir.
Karakter Sınfılarının Kale Savaşlarındaki Özellikleri
- Maceracı
Hayalet. Kale savaşının bir turunda 2. isbatten itibaren turun geri kalanındaki atışlardan kaçma şansı %25 artar. Bu, 2-4 atıştan sonra kale haritasından hemen hemen "kaybolma" ihtimalinizin yüksek olduğu anlamına gelir. Hâlâ haritadasınız, herkes sizi görebiliyor ama vurulamıyorsunuz. Siz yenilmezsiniz. Sizler nihai engelleyicilersiniz.
- Düellocu
Kritik Vuruş. Kale Savaşlarında Kritik Vuruş yapma şansı %10. Those are crits by duellers. Bu, rakibe çok yüksek hasar verebileceğiniz anlamına gelir. Rakibin Maksimum HP'sinin %10'una + silah hasarınıza (artı yönetmek yeteneğinden aldığınız ekstra hasar) eşit bir hasar verme şansına sahipsiniz. Evet, bu yüzden 1500 hatta 3000 gibi çılgın vuruşlar görürsünüz. Bunlar düellocular tarafından yapılan kritik vuruşlardır. Sizler bizim hasarcılarımızsınız.
- Asker
Yönetimi Paylaşma ve Yüksek Hayat. Diğer tüm sınıflar için, Hayat Puanı yetenek puanlarına harcanan 1 puanı, onlara 10 HP verir. Sizler içinse 15 HP verir (eğer premium iseniz bu 20 HP'ye kadar çıkar). Ayrıca, sizin ve 4 komşu oyuncunuzun yönetmek yeteneğini %25 artırırsınız (premium iseniz %50).Sizler etten kalkanlarsınız, ön hattımızsınız, diğerleri için kurşun yiyorsunuz.
- İşçi
Yüksek Sektör Bonusu. Sektörden %30 daha fazla (veya premium iseniz %60) bonus alırsınız. Yani sektörünüzdeki birinin herkese +3 saldırı veren bir silahı varsa, bunu ve üstüne %30 daha fazlasını alırsınız. Aynı şey hasar ve diğer bonuslar için de geçerli. Bu bonus binaları, duvarları ve kule bonuslarını içerir. Biraz hasar verebilen iyi bir engelleyicisiniz.
- Acemi
Herhangi bir özelliğe sahip değil. Takımın geri kalanı nihayet kararınızı vermenizi ve yukarıda belirtilen 4 sınıftan birini seçmenizi bekliyor.
Orders
Every proper fort fight has a leader. You will identify that person in many ways. Usually it's a person writing in capital and bold letters. Most of the time they use a coloured text too. He or she is an experienced player that has done this before. Always follow the leader’s orders. Fort fighting is a team game, so it is crucial that we are all moving as one.
| The general idea is we move as a team, sharing the fire we take while trying to hurt the opponents. This is why having a good LOS is important and working as a team is even more important. |
Hint: During the battle you might get some orders that you don’t understand. Don’t be ashamed to ask in the chat for clarifications. From my experience, there is always someone that wants to help new players and will end up talking to you in a whisper, helping you throughout the battle.
In order to move, click on your character and then click on an open spot at the end of your arrow in a neighbouring sector or in your current sector. At the beginning of the next round, your character will move to that spot or the closest one available. If the sector you are aiming at is full, you won’t move until a spot empties. Always remember that other fort fighters will probably aim at the same spot as you. Who will get that spot is determined by the movement hierarchy as described here. Therefore, if you are low in the movement hierarchy, try aiming at spots that are a bit less "popular" so as to be able to move as you wish.
Caution: You cannot move diagonally.
Movement hint: Aim one sector at the time. The game’s Artificial Intelligence (AI) isn’t that smart (yet) and doesn’t take into consideration the existence of enemies in the fort battle. The way it is designed, it is trying to get you to the spot you aimed at as fast as possible. Therefore, aiming 2 sectors away might get you in a pretty bad position with tons of enemies shooting at you and most probably ending up getting you killed. Always aim one sector at the time unless the leader orders you differently.
Aiming/Shooting
Aim and targeting is automatic. You cannot choose who you want to shoot, you cannot aim past the people in front. You may only shoot at the closest target in your line of sight. What you can do though is aim at a specific sector (that is adjacent to yours); this will make you shoot at the people in that sector.
\*One shot can’t take more than 1/3 of the maximum HP of a player. By maximum HP we mean maximum amount of health a player has when the battle starts. For example if the battle starts and you have 5400/7000 hp, your maximum HP is 7000.
To make it simple, always keep the following in mind:
1. The defenders shoot.
2. The defenders move.
3. The attackers shoot.
4. The attackers move.
So when you are attacking, always remember you will be shot at the beginning of the next round. So try not to be too much exposed at the enemy if you're low on health.
| Fort fighting is something that you are improving at as you gain more experience (like most things in life to be honest). Therefore, don’t be disappointed after a bad fort fight. Also don't be disappointed if you miss a lot or you don't dodge well. Always keep in mind that the attack and the defence chances are based on probabilities and sometimes we don't get lucky. Be persistent and you will get there. After all, we were all noobs before we started (some of us still are and will always be). |
After the fort fight
After the fort fight is over, you will get a report with the results.
If you passed out during the fight, you will be send back to your town's hotel and the game will automatically set 8 hours of sleep for you. If you don't have a town you will remain at the fort's location. If you die during a fort fight you don't lose your inventory or your banked cash; but you do lose the cash you're carrying on you and your energy drops to 0. If you survive, you will remain at the same location. Your health will match the health you had when the last round of the fort fight ended.
FAQ
Q1: What the heck! How did I end up on the wall? I didn't aim there!
When you end up in a sector you haven't aimed at, this means that you probably set your character to move 2 sectors away, letting the game's AI decide the best route for you. The best route for the game is the shortest way but surely not the safest one.
Q2: Why am I not taking part in the fort fight? I have a rank!
Blame the ranker! Apparently the person giving out ranks ranked more players than he should (also known as overranking). Therefore people with a higher rank than you (Generals > Captains > Privates) or higher leadership got in first and you didn't. You can find more details on the priority of the events here.
Q3: Why am I starting at this spot? I didn't place my character there!
Ok there are two explanations for this one. Either someone with higher hierarchy sat on you (stacked you) and you were pushed to the closest available spot or you forgot to place your character on the map before the fort fight.
Q4: Do I have to be awake to take part in the fort fight as a defender or can I sleep at the barracks?
You can set to sleep in the barracks. If you make it in the fort fight, the sleep will be cancelled though and after the fort fight you will be just sitting there. If you don't make it in though, you'll continue sleeping unless the fort is lost.
Got any further questions? Please contact me (Musagete) and I can help you and add them to this manual.